pixel art photoshop settings
Outline the Head And now the moment we have all been waiting for. The following steps will provide an in-depth guide in using photoshop with pixel art.

Pin On Digital Art Concept Art Homesthetics
By default Photoshop will set the resampling method to Automatic.

. Learn how to create pixel art in photoshop support brackeys on patreon. Resize and Select the Hard Edges In a new menu you need to select the height and width of an image. Before we go any further lets quickly summarize the steps for getting the best results when enlarging pixel art in Photoshop.
You might have to do this for every document. Next set the Hardness to 100. To do this set the size to 1.
Size to 1 pixel px. Creating pixel art in Photoshop is simple once you set up a canvas optimized for creating pixelated images. Remember pixel art should be crisp and sharp.
Change pixel dimensions of an image. Switch the Paintbrush for the Pencil put the Eraser into pencil mode and untick anti aliasing check boxes for the Lasso and Paintbucket. This focuses LESS on painting pract.
For the eraser tool mode was set to Pencil. Photoshop is a raster based program. Show the Grid optional Grid is helpful in positioning and aligning things precisely.
Firstly check on file then new and add a name to the canvas. In former Version you could directly change the PAR under Image. First lets change it from Pixels to Percent.
Turn off the AA and set the font size to 12 and voila - you have a pixel font. As with a real pencil or pen the pen tool is used to place coloured. Open the Image Size dialog box Image Image Size.
Learn how to create Pixel Art in Photoshop Support Brackeys on Patreon. First open the preferences in Photoshop and set the Image interpolation to Nearest Neighbor Create a new Page 300 px by 300 px at 72 dpi. To view a description of any profile select the profile and then position the pointer over the profile name.
Check the Constrain Aspect Ratio icon. Set the Width and Height to Percent and then for best results choose a percentage thats a multiple of 100 200 300 400 and so on. To turn on and configure a grid in PS navigate to Photoshop-Preferences-Guides Grid Slices Count Make sure to set Gridline every to 1 and Subdivisions to 1.
Instead of inches choose Pixel. Select the Pencil tool at 1 pixel. Next lets scale up our pixel art by 1000 on both the Height and Width.
The contiguous toggle for. Open your image file inside of photoshopOpen guides grids and slices settings from the preferences menu and update the grid settingsPhotoshop is a raster based programPixelate your image by resizing it using the image size command Press ctrlk or cmdk on mac to open the preferences window and enter guides grid slices. -Download the Select Layer -scripts by XSHOCK bind them to F2 and F3 and combine that with layer arrange bring forward and bring backward to F1 and F4 and you have some really neat keyboard shortcuts for quickly working with your layers.
Use the Pencil tool to preserve hard edges. You can also open the Image menu scroll down a bit and select Image Size. Keep doing this until you have the desired number of pixels.
To display working space options in Photoshop Illustrator and InDesign choose Edit Color Settings. Hopefully things are mostly the same. I like to go into the settings and turn off pixel grid if its on- that thing makes it impossible to see.
This property will prevent anti-aliasing making our pixels sharp. This will allow us to scale up our image in even increments so that our pixels dont become stretched. Fix Pixelated Pictures with Photoshop Open your image in Photoshop.
To retain the clarity of the pixel artwork you should switch to a vector bed program such as illustrator. This will create a 1px grid on for you to use as a guide. Open a new canvas.
We want to change those settings. Set the Width and Height to Percent. The only other tool I used was the paint bucket which didnt require any customization.
Check the Resample option. Set the width and height to something small in my case ill start by making a ground tile so the width and height are set to 16 set color mode to rgb color then click. You can specify a default interpolation method to use whenever Photoshop resamples image data.
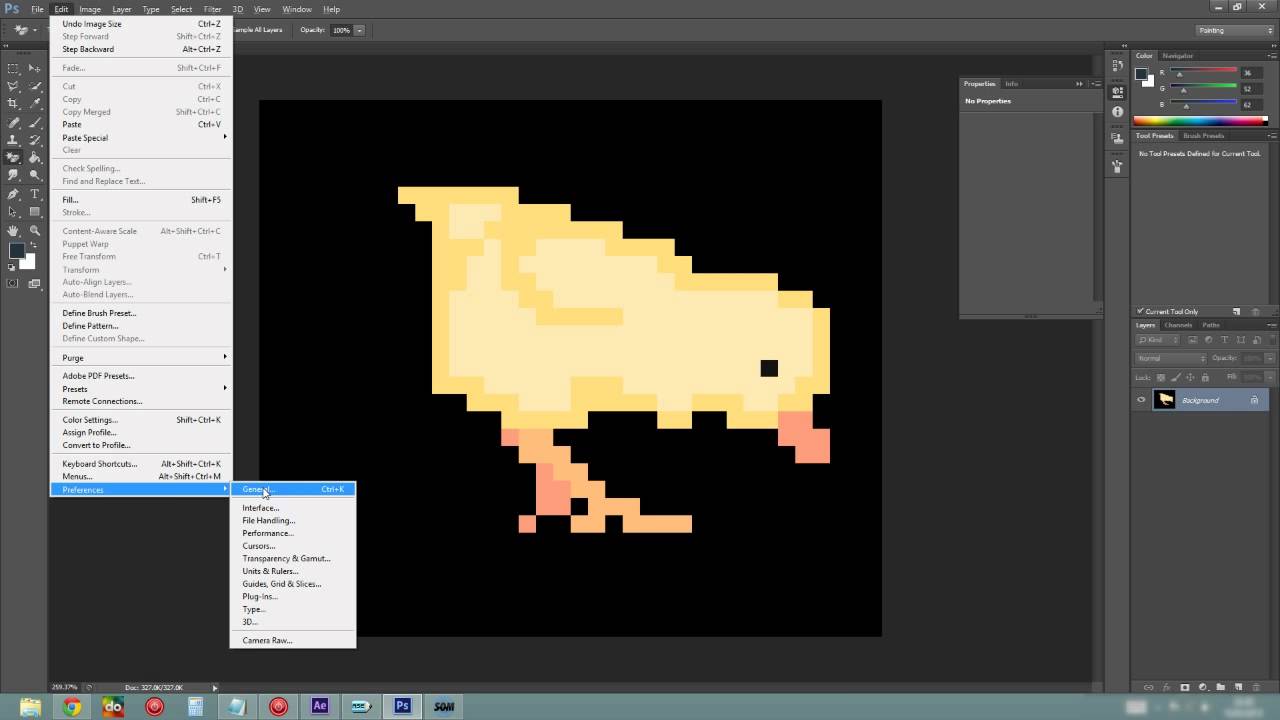
Choose Edit Preferences General Windows or Photoshop Preferences General MacOS and then choose a method from the Image Interpolation Methods menu. I find grid very useful when creating sprites. Now its only possible while creating a new Image at least I couldnt find a hint where it might be located now.
Open your pixel art image in Photoshop and go to Image Image Size. In Acrobat select the Color Management category of the Preferences dialog box. Since we are doing pixel art we want this to be ultra fine.
Complete Texture Pack by on. That will cause our image to change from 32x32 pixels in size to 320x320 pixels in size. Choose 72ppi for the resolutions and click on create The second step is to click on nearest neighbor on photoshop.
Next change the units to pixels and add selective pixel units. The new blank image will appear you can zoom in by pressing ctrl and Pixel art photoshop settings. Change the image interpolation setting to Nearest Neighbor preserve hard edges.
First thing is obviously to turn off all the anti aliasing. This will allow us to draw 1 pixel at a time. Set up a grid.
Open the Image Size Dialog Window To find the settings menu you need to open a new dialog window by pressing the Alt Ctrl I key combination. Open guides grids and slices settings from the preferences menu and update the grid settings. In this tutorial I show you how to set up all of the tools that a beginner would ever need to get started with pixel art.
In this case the image dimensions are 48 x 48 px. Once you have configured the grid click on View-Show-Grid to display it. Change subdivisions to one.

Isometric Pixelart Tutorial I Tend To Use Adobe Imageready For All My Pixelart Having Used Photoshop For Years I M Used Pixel Art Tutorial Pixel Art Pixel
Retro Pixel Art Animation Tutorial Pixel Art Animation Tutorial Pixel Animation

Colorful Pixel Art Action Pixel Art Photoshop Actions Pixel

Colorful Pixel Art Action Pixel Art Art Photoshop Actions

Mountain Tutorial By Mistress Jaeden On Deviantart Digital Painting Tutorials Pixel Art Tutorial Tutorial

Gas13 Ru Pikselnaya Grafika I Uroki Photoshop Photoshop Tutorial Pixel Art Isometric

A Few People Asked Me To Make A Pixel Art Tutorial So Here It Is It S Not Much And Very Basic But I Hope You Will Find It Pixel Art Tutorial

Pixel Game User Interface Pixel Games Game Interface Game Gui
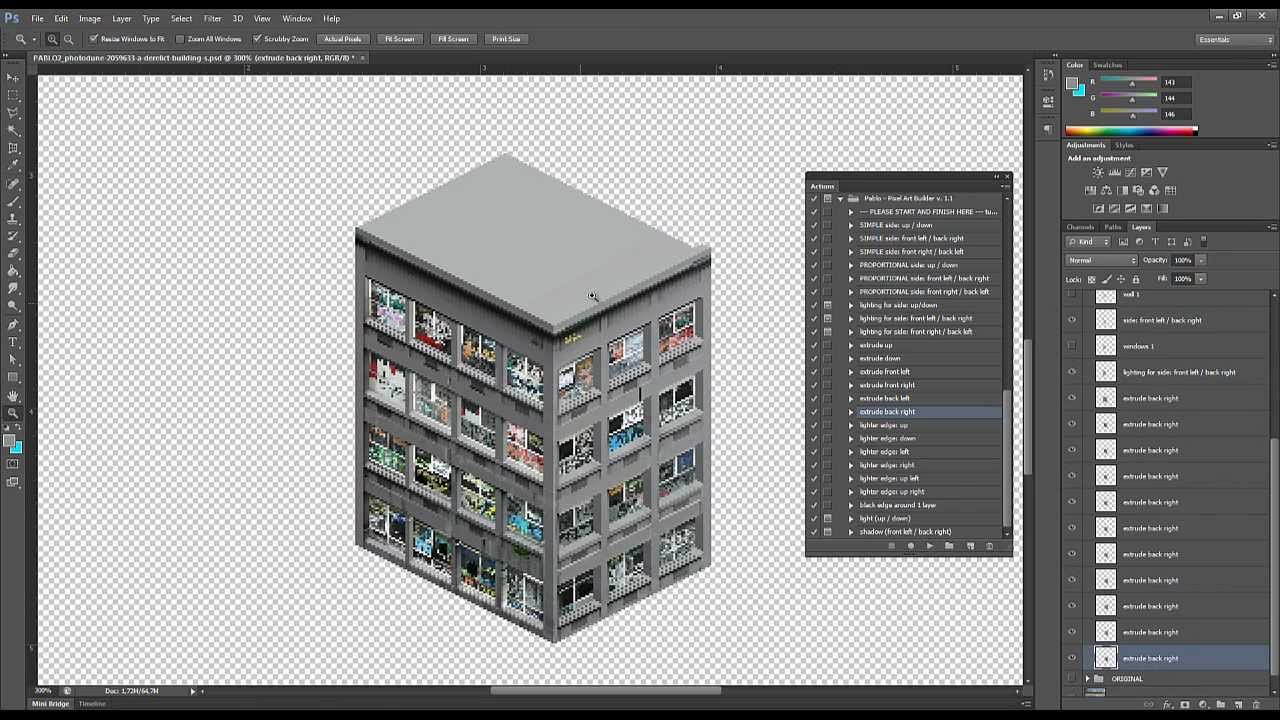
Pablo The Pixel Art Builder Photoshop Add On Pixel Art Generator Pixel Art Photoshop

Pin On 1 公益教程 Jack Ui

96838710 O Gif 880 3 164 Pixels

21 Pixel Art Photoshop Actions Pixel Art Actions Photoshop Photoshop Actions Pixel Art Photoshop
Creating Pixel Art In Photoshop Pixel Art Tutorial Pixel Art Pixel Animation

Colorful Pixel Art Action In 2022 Pixel Art Photoshop Actions Photoshop

Pin On Redrabbit S Pixel Tutorial

Space Shooter Creation Kit Pixel Art Craftpix Net Pixel Art Space Art Pixel

Animating Pixel Art In Photoshop Pixel Art Animation In Photoshop Pixel Art Tutorial

Pixel Art Action Pixel Art Photoshop Art Photo Art

Colorful Pixel Art Action Pixel Art Pixel Photoshop Actions